The Ultimate Guide to Wiring a 4-Pin & 5-Pin Relay
- November 5, 2025
- 9,199
- DAIER Technical Team
Learning how automotive relays work and wiring them like a pro for your next project is the essential first step toward building a safe, reliable, and professional-grade electrical system. Whether you are installing blinding off-road LED light bars, a massive cooling fan, or an upgraded air horn, mastering this fundamental component protects your dashboard switches from melting and prevents catastrophic electrical fires. This comprehensive guide breaks down exactly what relays do, how to wire both 4-pin and 5-pin variants correctly, and the best practices for fusing your new circuits.
What is a Relay and Why Do You Need One?
Have you ever wanted to install a powerful new accessory in your vehicle, like a high-output LED light bar, a loud horn, or a cooling fan, but worried that your small dashboard switch couldn’t handle the high electrical current?
You’re right to be cautious. Pushing too much power through a low-amperage switch is a recipe for overheating, switch failure, and even a potential fire hazard.
So, how do you safely control a high-power device with a small, convenient switch? This is where the automotive relay comes in.
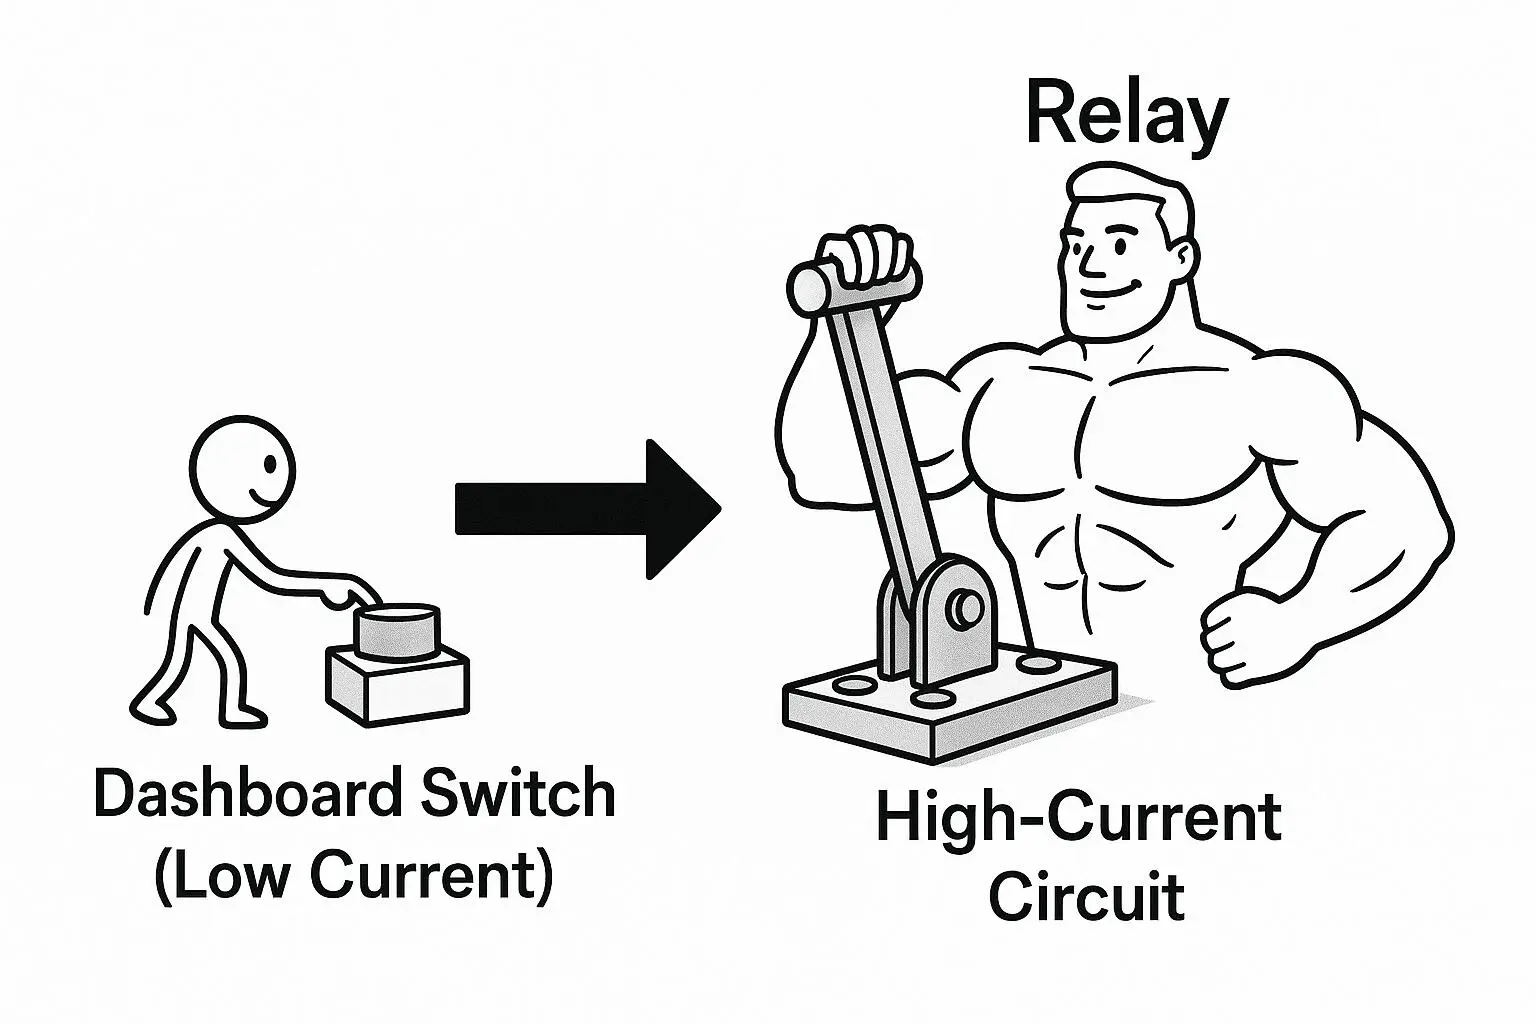
A relay is essentially an electromagnetic switch. It uses a very small amount of current to control a much larger amount of current. Think of it as a tiny manager telling a heavyweight champion when to fight. This simple but brilliant device allows you to safely power heavy-duty accessories without replacing your stock dashboard switches, protecting both your new gear and your vehicle’s electrical system.
The Core Principle: How Does a Relay Actually Work?
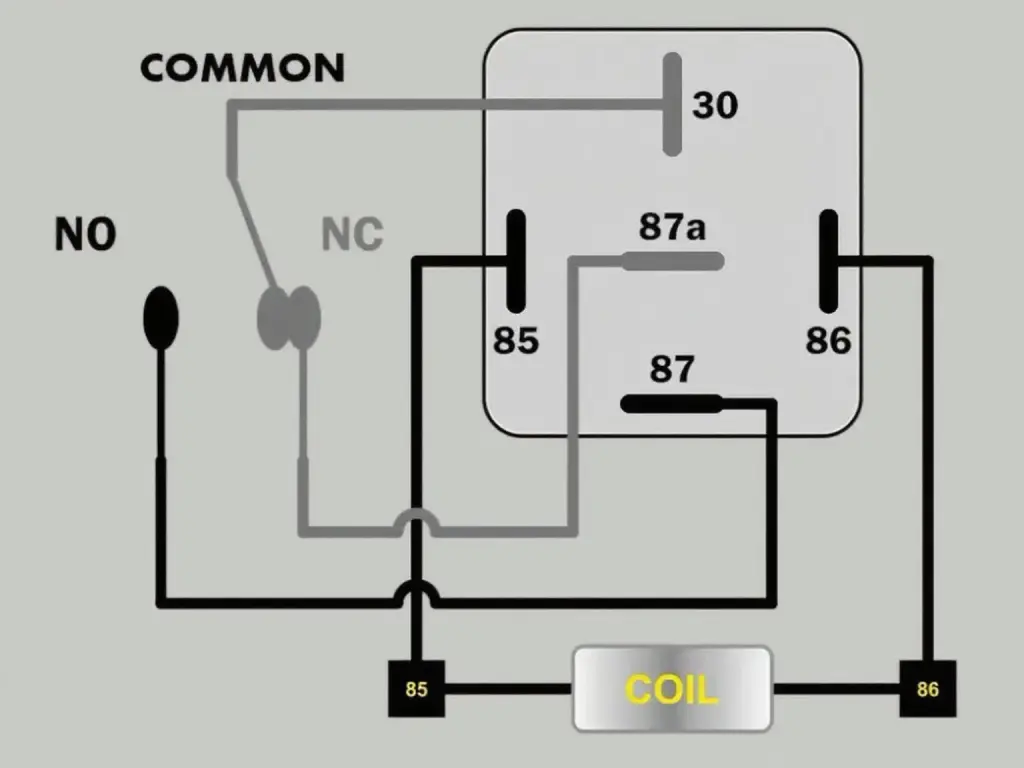
To understand how to wire a relay, you first need to know what’s happening inside that little black box. A standard automotive relay has two separate circuits: a control circuit (low current) and a load circuit (high current).
- ■ Inside the relay, there is an electromagnet (the Coil).
- ■ When you flip your small dashboard switch, a tiny current flows through the control circuit (Pins 85 & 86), activating the electromagnet.
- ■ This magnet pulls a metal arm, instantly closing the load circuit (connecting Pin 30 to Pin 87).
- ■ A large current can now flow directly from the battery, through the relay, to your power-hungry accessory.
- ■ When you turn your dashboard switch off, the electromagnet deactivates, the arm springs back, and the high-power circuit is broken. It’s that simple and that safe.
The Ultimate Wiring Guide: 4-Pin vs. 5-Pin Relays
Now for the practical part. Let’s wire it up! We will use a standard 5-pin relay for our main example, as it includes all possible connections. As you can see, a 5-pin relay has numbered terminals. Here is what each pin does and where it connects:
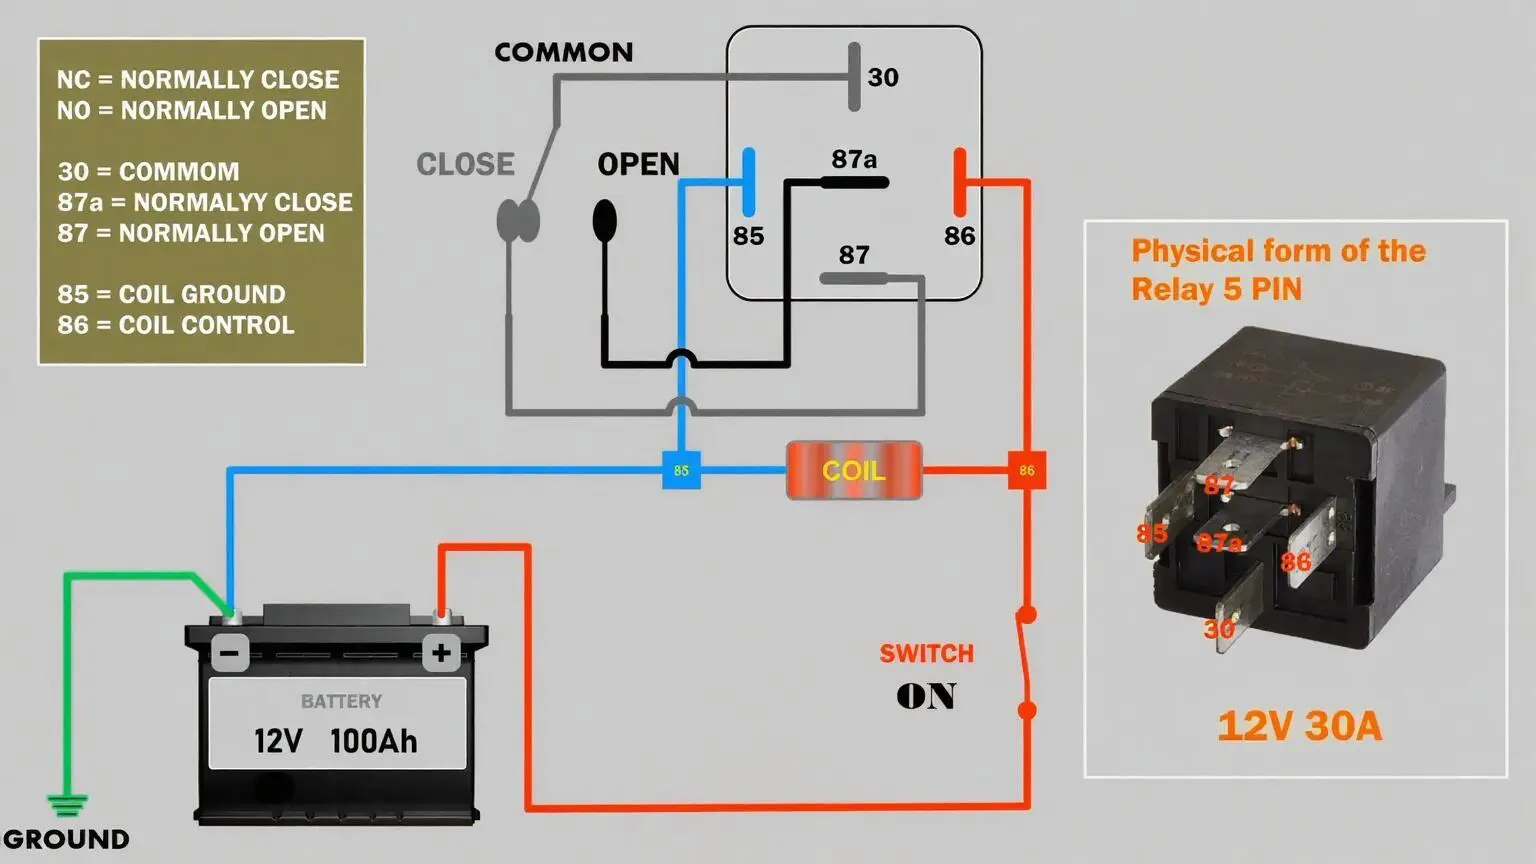
- ➤ Pin 85 (Coil Ground):
This pin is for the control circuit’s ground. Connect this wire to a solid metal ground point on your vehicle’s chassis or directly to the battery’s negative terminal. - ➤ Pin 86 (Coil Control):
This is the “trigger” for the relay. Connect this wire to the output of your small dashboard switch. When you flip the switch, it sends a small positive current to this pin. - ➤ Pin 30 (Common Power Input):
This is the power source for your accessory. Connect this directly to the positive terminal of your vehicle’s battery. Crucially, you should always install an inline fuse between the battery and this pin to protect the circuit.
Where to Add the Fuse
Pin 30 always needs protection. For a single accessory, an inline fuse holder spliced into the feed wire is enough. Once you are switching two or more accessories, an inline fuse is no longer enough: a fuse block keeps every circuit separate, so a fault in one accessory does not take the whole feed down, and a blown fuse can be replaced without cutting a single wire.
Choose the block by the number of ways you need and by where it will live. The FB-1714 12-way block takes up to 30A per circuit and 100A per block on 12V or 24V systems, and its LED shows which fuse has blown. In engine bays, boats and other damp locations, use a waterproof fuse block with a sealed cover rather than an open block.
- ➤ Pin 87 (Normally Open – NO):
This is the power output to your accessory. Connect this wire to the positive terminal of your high-power device (e.g., your LED light bar, fan, or horn). When the relay is off, this pin is disconnected. When the relay is triggered, Pin 30 connects to this pin, sending power to your device. - ➤ Pin 87a (Normally Closed – NC):
This pin is the opposite of Pin 87. It is connected to Pin 30 when the relay is off. When the relay is triggered, the connection is broken. In most simple automotive projects (like turning a light on and off), you will not use this pin. It is typically left disconnected. It is useful for applications where you want to switch power between two different devices.
What About a 4-Pin Relay?
A 4-pin relay is simply a 5-pin relay without the 87a (Normally Closed) terminal. Its function is identical for most common applications. The wiring is exactly the same; you just don’t have an unused 87a pin to worry about.
Troubleshooting Common Issues
Possible Cause: The control circuit (85, 86) is working, but the load circuit is not. Check the fuse between the battery and Pin 30. Check the connection at Pin 87. Ensure your accessory has a proper ground.
Possible Cause: You may have accidentally connected your accessory to Pin 87a (Normally Closed) instead of Pin 87 (Normally Open).
Possible Cause: This is dangerous. It could mean the relay’s amperage rating is too low for your accessory, or you are using wires that are too thin. Disconnect immediately and re-evaluate your components.
Common Applications for Automotive Relays
Now that you’re a wiring expert, where can you put your new skills to use? Automotive relays are the gateway to countless high-performance upgrades. Here are some of the most popular projects where a relay is not just recommended, but essential:
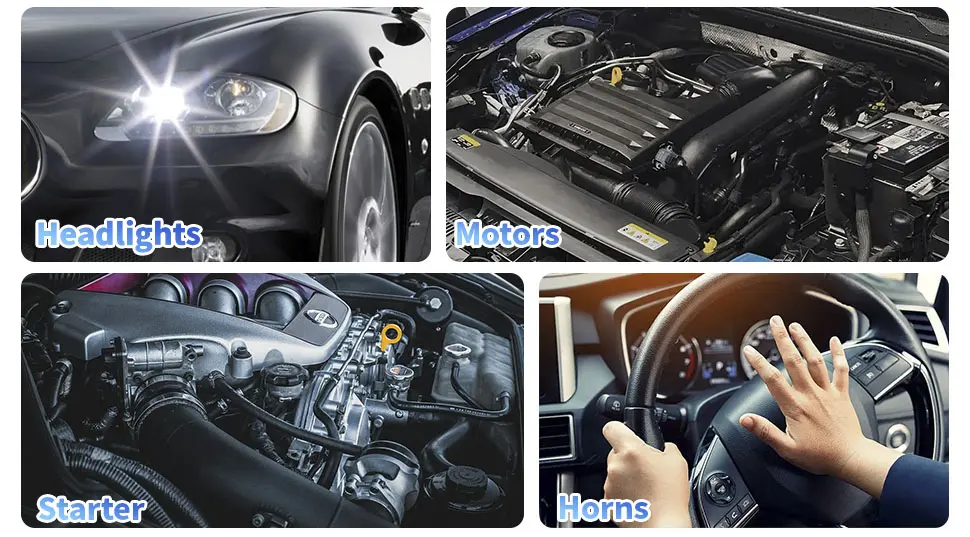
- ■ High-Power Lighting: This is the most common use. Relays are perfect for installing off-road LED light bars and pod lights, powerful fog lights, and upgraded headlight harnesses.
- ■ Electric Cooling Fans: An electric radiator fan draws a significant amount of current when it kicks on. A relay ensures it gets the clean, high-amperage power it needs without overloading your vehicle’s stock wiring.
- ■ Loud Horns: Upgrading from a stock horn to a powerful air horn or dual-tone horn set always requires a relay to handle the increased power demand.
- ■ High-Performance Fuel Pumps: In performance vehicles, upgrading to a high-flow fuel pump is common. A dedicated relay circuit ensures the pump receives consistent voltage for optimal engine performance.
- ■ Audio Systems: Powering large amplifiers for a high-end sound system is another key application where relays are used to manage the heavy electrical load.
No matter the application, using a high-quality relay is the key to a safe, reliable, and professional-grade installation.
Relay + Fuse: How to Power Multiple Accessories Safely
One relay handles one load. As soon as you add a light bar, an air compressor, a fridge and a radio, you need somewhere every circuit can be switched and protected without turning the engine bay into a loom of inline holders.
A fuse relay box combines the relays and the fuses in one enclosure: each accessory gets its own relay slot and its own blade fuse, the main feed enters through a single stud, and every output is labelled. The RB-R6F6-W1, for example, holds six ATC/ATO fuses and five Bosch-style relays plus one RTT7121 relay, and it is built for car, truck, marine and motorsport installations.
If you would rather not crimp every terminal yourself, a pre-wired relay box arrives with the loom terminated and the outputs marked. The RB-R10F10-W1 takes ten ATC/ATO fuses and ten relays (eight 4-pin and two 5-pin), which is enough for a full accessory panel on a truck or a boat.
Not sure how many ways your build needs? Our guide to how to choose a 12V fuse relay box breaks the options down from 4-way to 16-way, and the fuse blocks and holders range covers the ATC, ATO, mini and ANL styles used in most vehicles.
Frequently Asked Questions – FAQ
▸ Do I really need a fuse for my relay?
Absolutely. The fuse is not to protect the relay or your accessory; it’s to protect your vehicle from a potential fire. It’s the most critical safety component in the circuit. We recommend a fuse rated slightly higher than your accessory’s current draw.
▸ Can I use a fuse block instead of an inline fuse?
Yes, and once you run more than one accessory it is the better choice. An inline fuse protects a single feed, while a fuse block gives every circuit its own fuse in one place: a fault on one accessory does not affect the others, and fuses can be swapped without cutting wire. For a single accessory an inline holder is still the simplest option.
▸ What size fuse should I use for a 12V relay circuit?
Match the fuse to the current draw of the accessory, not to the relay. Add up the continuous current the load pulls, then fit the next standard blade fuse above that figure: a load drawing 10A takes a 15A fuse. The relay itself only carries the switching current. Never fit a fuse larger than the wire feeding the circuit can carry.
▸ Do I need a relay box for multiple accessories?
From about three switched accessories upwards, a box pays for itself. A relay box, or a combined fuse relay box, centralises the relays and fuses, shortens the wiring runs, keeps the main feed protected at one point, and makes a fault far quicker to trace.
▸ Can I use a 5-pin relay to replace a 4-pin relay?
Yes, in 99% of cases. A 5-pin relay works identically to a 4-pin relay if you simply leave the 87a (Normally Closed) terminal disconnected. It’s a versatile replacement.
▸ What wire gauge should I use for my relay wiring?
This is crucial. The wire gauge depends on the current (Amps) of your accessory and the length of the wire. For most common automotive applications (15-20 Amps), a 14-gauge wire is a safe choice for the high-current circuit (Pins 30 and 87). Always check a wire gauge chart to be sure.
▸ Where is the best place to mount a relay?
Mount the relay in a dry location, away from extreme engine heat and direct water spray, such as on the firewall inside the engine bay or under the dashboard. Mounting it with the terminals facing down can help prevent water from collecting inside.
Choose Reliability, Choose Daier
A reliable relay is the heart of a safe and durable custom electrical project. A low-quality relay can fail under load, leaving you stranded or, worse, causing electrical damage.
At Daiertek, we provide a wide range of rigorously tested, high-quality automotive relays designed to handle demanding applications with stability and safety.
